SOCIAL MEDIA

Showing posts with label DT. Show all posts

01 December, 2018

Santa mermaid

maya isaksson waffle flower chibitronics

Today the Chibitronics team has the great pleasure to collaborate with Waffle Flower. They make the most unique stamps, and I fell in love with the set called The SEAson with this handsome Santa mermaid and his fish friends.

I made the Christmas decorations on the seaweed light up using LEDs by Chibitronics. It turned out really fun! I used red lights for this, and it looks super christmasy and fun.

maya isaksson waffle flower chibitronics1

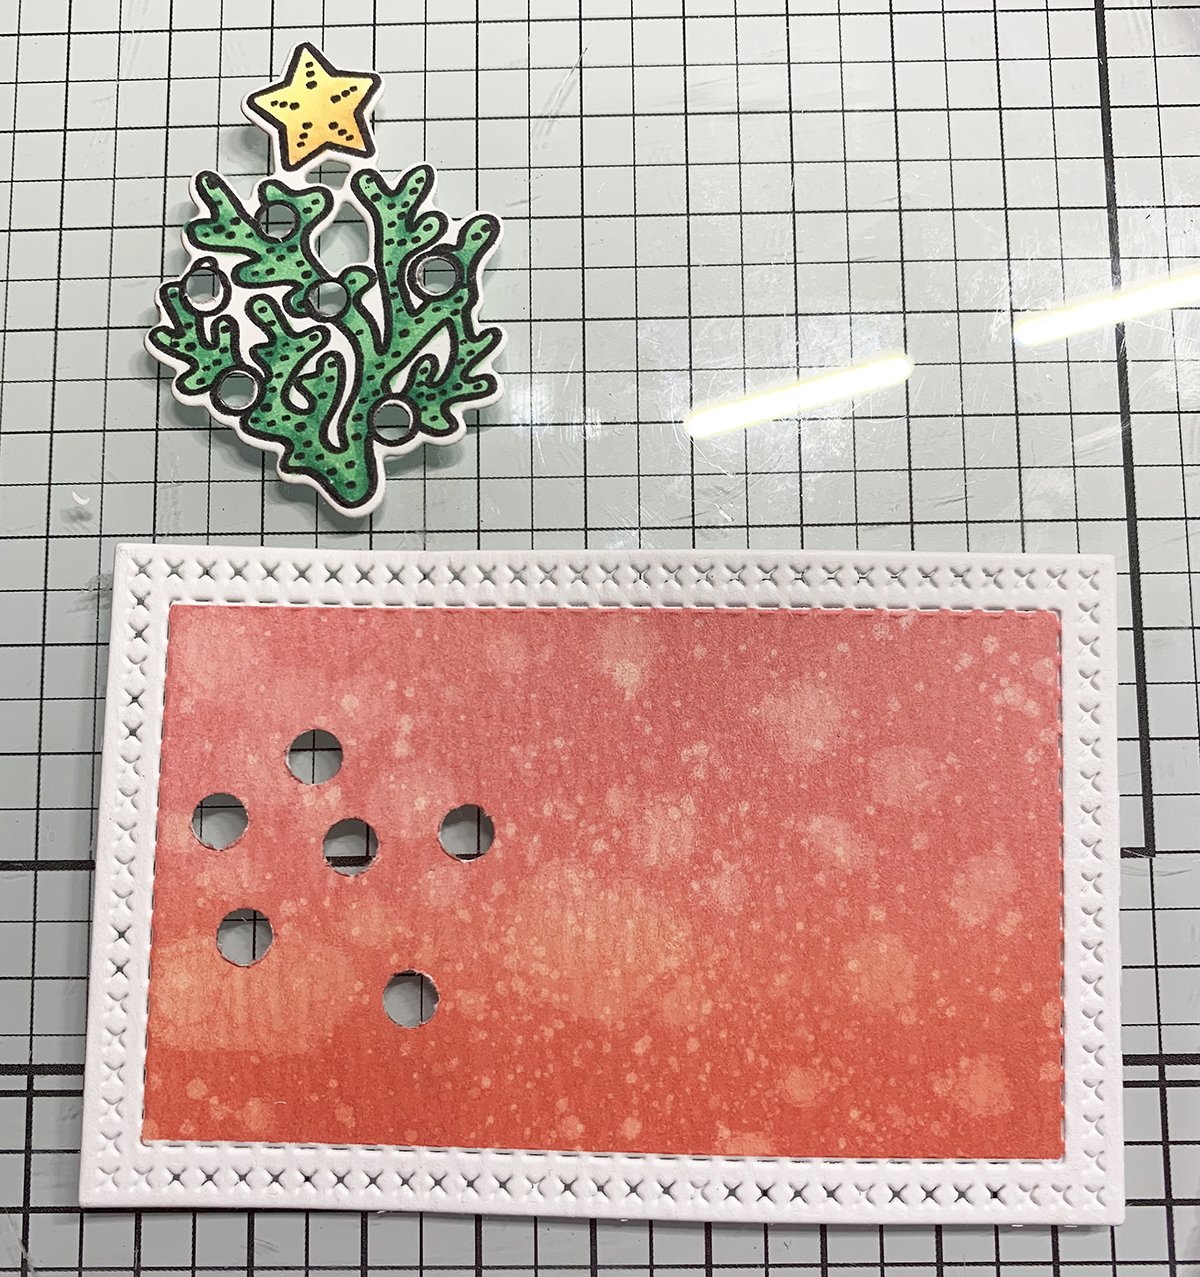
I made a front panel that hid the circuit. I punched holes where the light would show up and backed with vellum. I colored it red using copics before adhering it on the back of the panel.

maya isaksson waffle flower chibitronics2

Here's my (messy looking) circuit. I used a pull tab switch that I learned from Eiko on the Chibitronics team. I used some packaging tape on the inside because my regular one was missing, no one will see the mess anyway. Except for you, and you won't tell anyone, right? ;)

If you go to todays post in the Chibitronics blog you will be able to see all of my teammates cards and creations using Waffle Flower products.

15 August, 2018

Unicorn with glowing rainbow

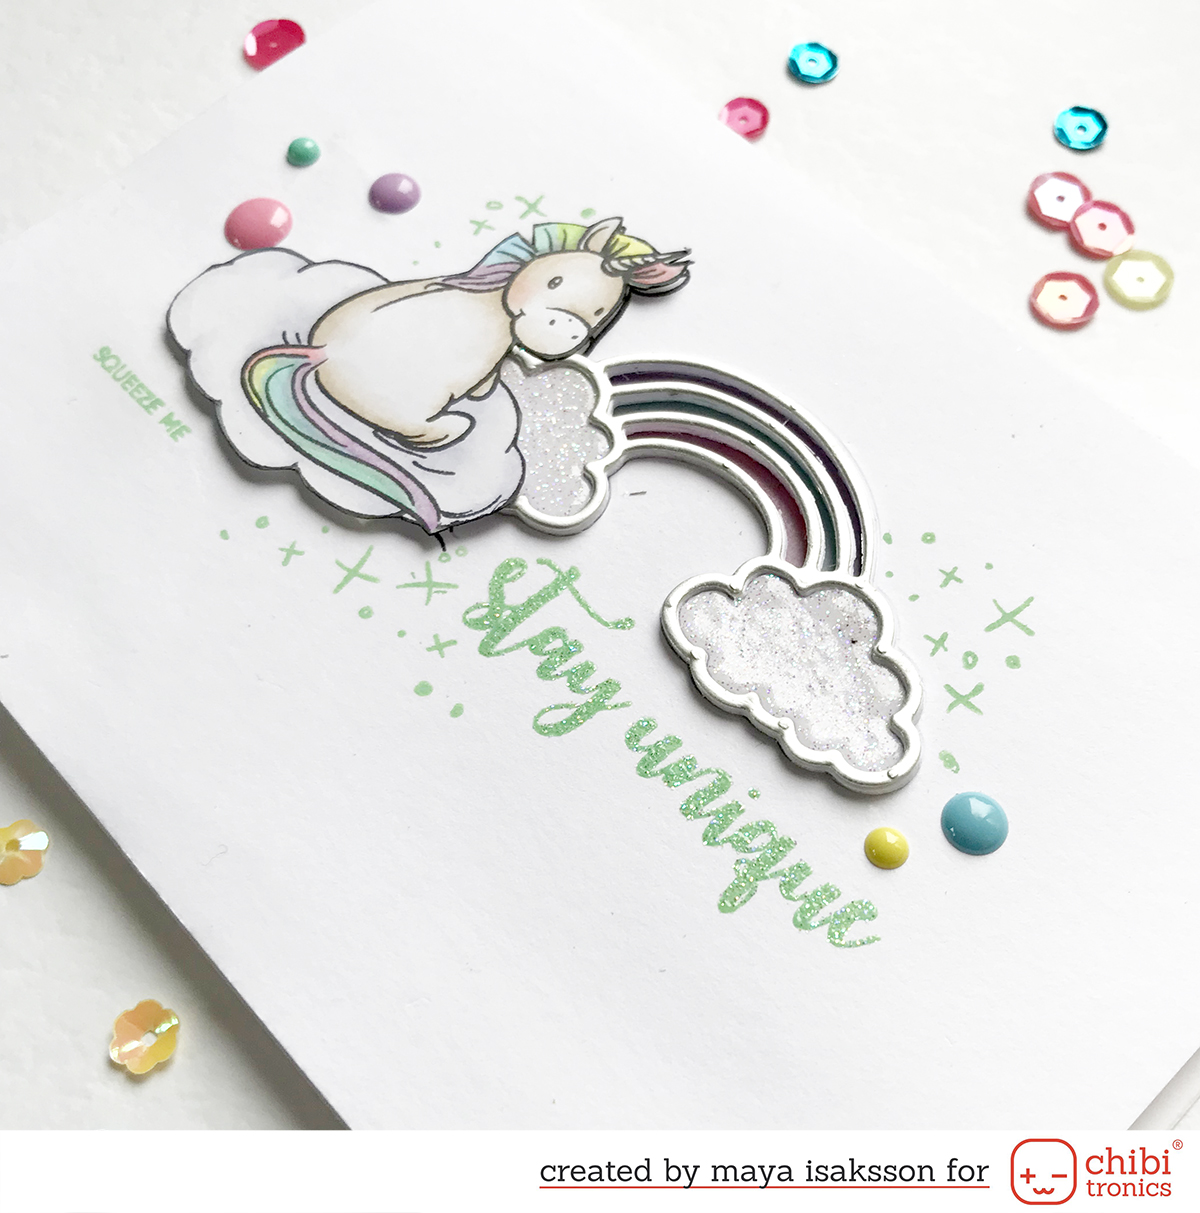
Today I'm up on the Chibitronics blog with this cute card! I used stamps, dies, and decorations from Uniquely Creative. I haven't shared the news here on the blog but I am now a member of their amazing design team. I fell in love with the quirky style of their stamps and dies. I mean look at this chubby unicorn, what's not to love???

Maya_Isaksson_chibitronics_august

I love the rainbow die cut, so I decided to light it up using Chibitronics. It makes the card even more magical, don't you think?

Maya_Isaksson_chibitronics_august_light

You can find a full step for step guide over at the Chibitronics blog.

Maya_Isaksson_chibitronics_august_close

The cutest little unicorn, and to light the rainbow up you squeeze his little butt, LOL!

Have a lovely day and thanks for stopping by!

23 May, 2018

Chibitronics and Winnie & Walter bloghop

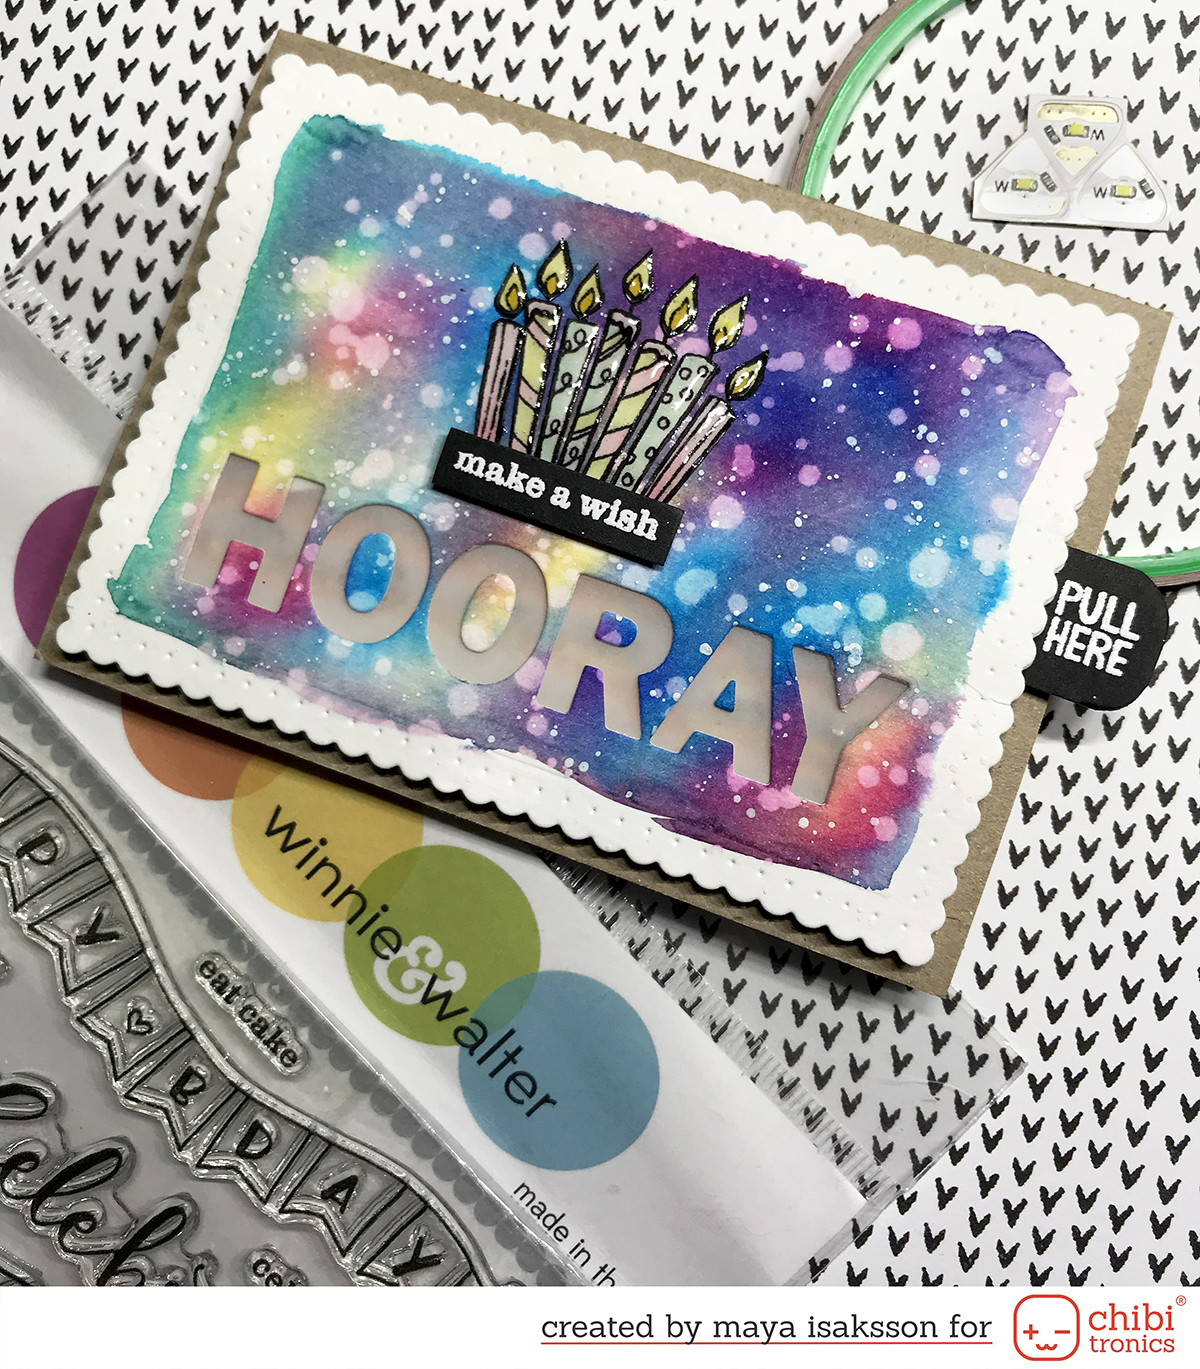
Today I'm part of a collaboration blog hop between two of my absolute favorite companies in the craft world. Chibitronics and Winnie & Walter. I have stalked followed Winnie & Walter since the start and I adore their wonderful products. And I found the perfect sets to pair up with some fun Chibitronic lights and effect stickers.

33328846_10100278302881404_8703062724906582016_o

You can enter the giveaway by commenting on the blog posts along the way. You have until 11:59 PM CST next Tuesday, May 29th in order to be eligible for the giveaways.  Chibitronics are giving away a $30 starter kit so you have everything you need to start making fun interactive cards with lights. Winnie and Walter are giving away a $30 gift certificate for you to spend on their lovely products. Good luck!

Maya Isaksson Chibitronics Winnie Walter1

I totally fell for the birthday themed stamp set called Wish Big with Evelin T Designs and I found some dies, In a Word: Birthday Tiles Cutaways, that was to die for. Sorry, couldn't resist it! The big birthday words were perfect to make a window with lights behind with and to add some extra fun I used a blinking effect sticker.

[wpvideo xquE1aaR]

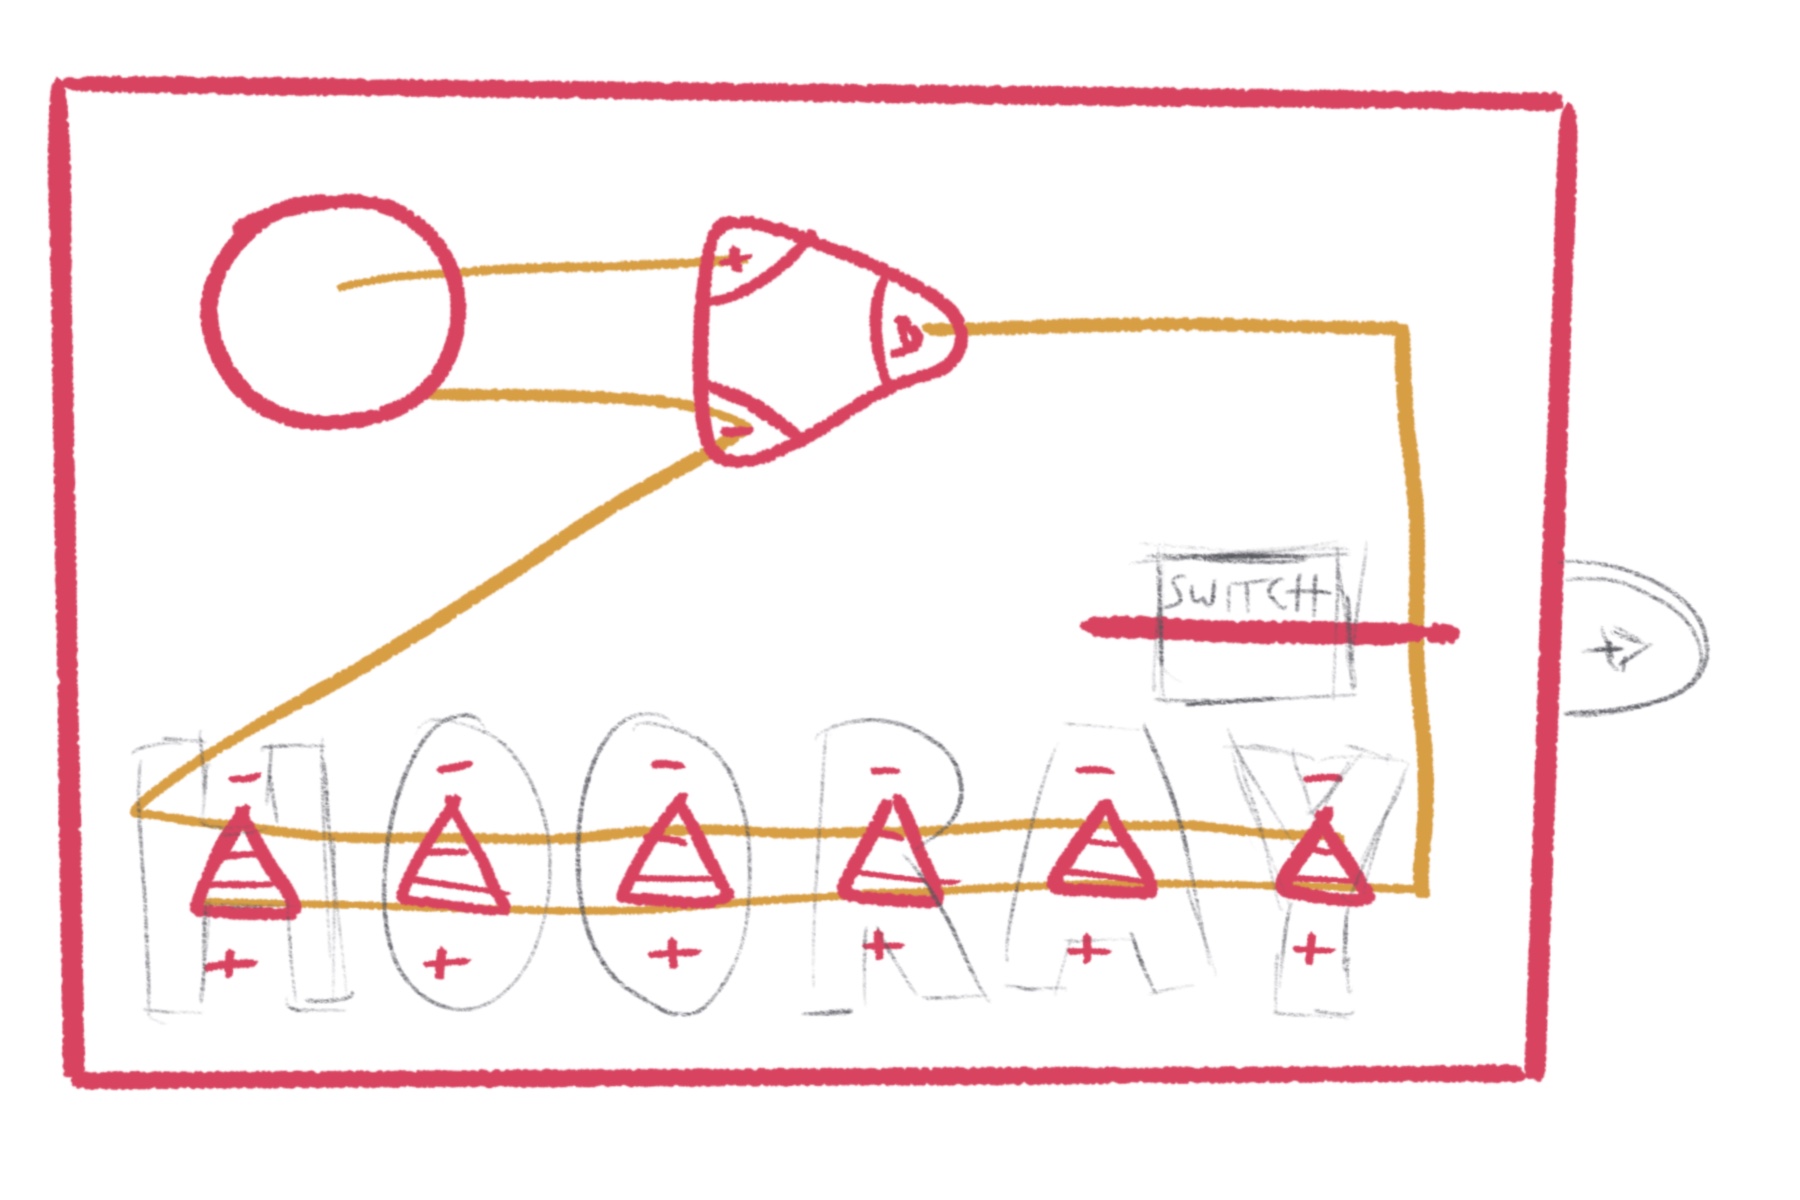
To use an effect sticker is not hard at all. Just connect the negative side of the battery to the - on the effect sticker and then on to the - on the LEDs. The + side of the battery (the top) goes to the + on the effect sticker. Then another connection from blink on the effect sticker and to the + side of the LEDs. My picture of the inside was after the foam tape was added and it looks super messy so I drew a picture of the connection instead.

IMG_0475

The switch is of the type you pull out to start the lights. I have gotten the idea from Eiko on the Chibitronics team, it's pretty brilliant, here's a picture from a previous card to show you what it looks like.

Maya isaksson chibitronics sweet stamp shop circuit3

So the switch is in the shape of an X and the copper tape goes around it to connect both sides of the cut circuit. I find that it doesn't drain the battery as easily because there is no connection before you want it. A regular push switch sometime connects when something is put on top of it or when you mail the card.

Maya Isaksson Chibitronics Winnie Walter2

Now hop on to the incredible Vanessa Amann and see what she came up with.

If you get lost on the way, here's a list of all the stops. Have fun!

Chibitronics Blog
Jessica Frost-Ballas
Eiko Uchida
Kelly Szafron
Wei Wei Wang
Kelly Griglione
Tiffany Au
Lesley Oman
You are here ---> Maya Isaksson
Vanessa Amann
Gayatri Murali
Heather Hoffman
Jessica Lin
Kate Capper
Keren Baker
Lea Lawson
Lydia Evans
w&w blog

Chibitronic supplies used:
Red, Yellow, Blue MegaPack (30 stickers)

Circuit Stickers Effects Add-On
Copper Tape
Conductive Fabric Tape Patches

02 April, 2018

World autism day blog hop

Maya_Isaksson_light_up_blue_bloghop

Today I and the Chibitronics team is part of a bloghop for Autism awareness and we are lighting it up blue. April 2nd is the World Autism Awareness Day and the color blue is often used as a symbol together with the puzzle piece.

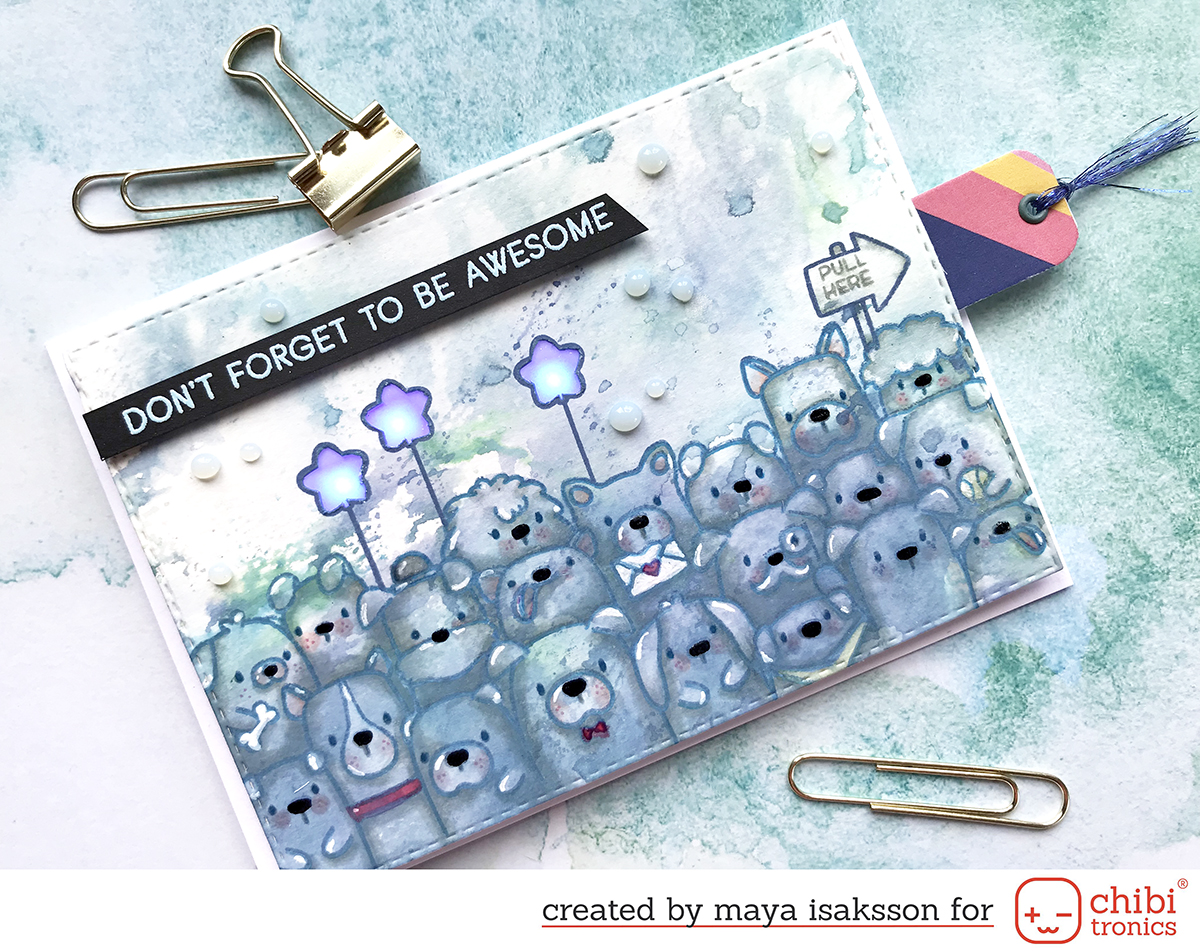
I think most of us are somehow connected to someone with autism, through friends or family. They are all amazing individuals in their own unique way and have a different perspective of the world that can be pretty fantastic. That's why I selected the sentiment Don't forget to be awesome. And of course, I lit it up blue using the blue Chibitronic LEDs.

Maya_Isaksson_light_up_blue_bloghop_circuit

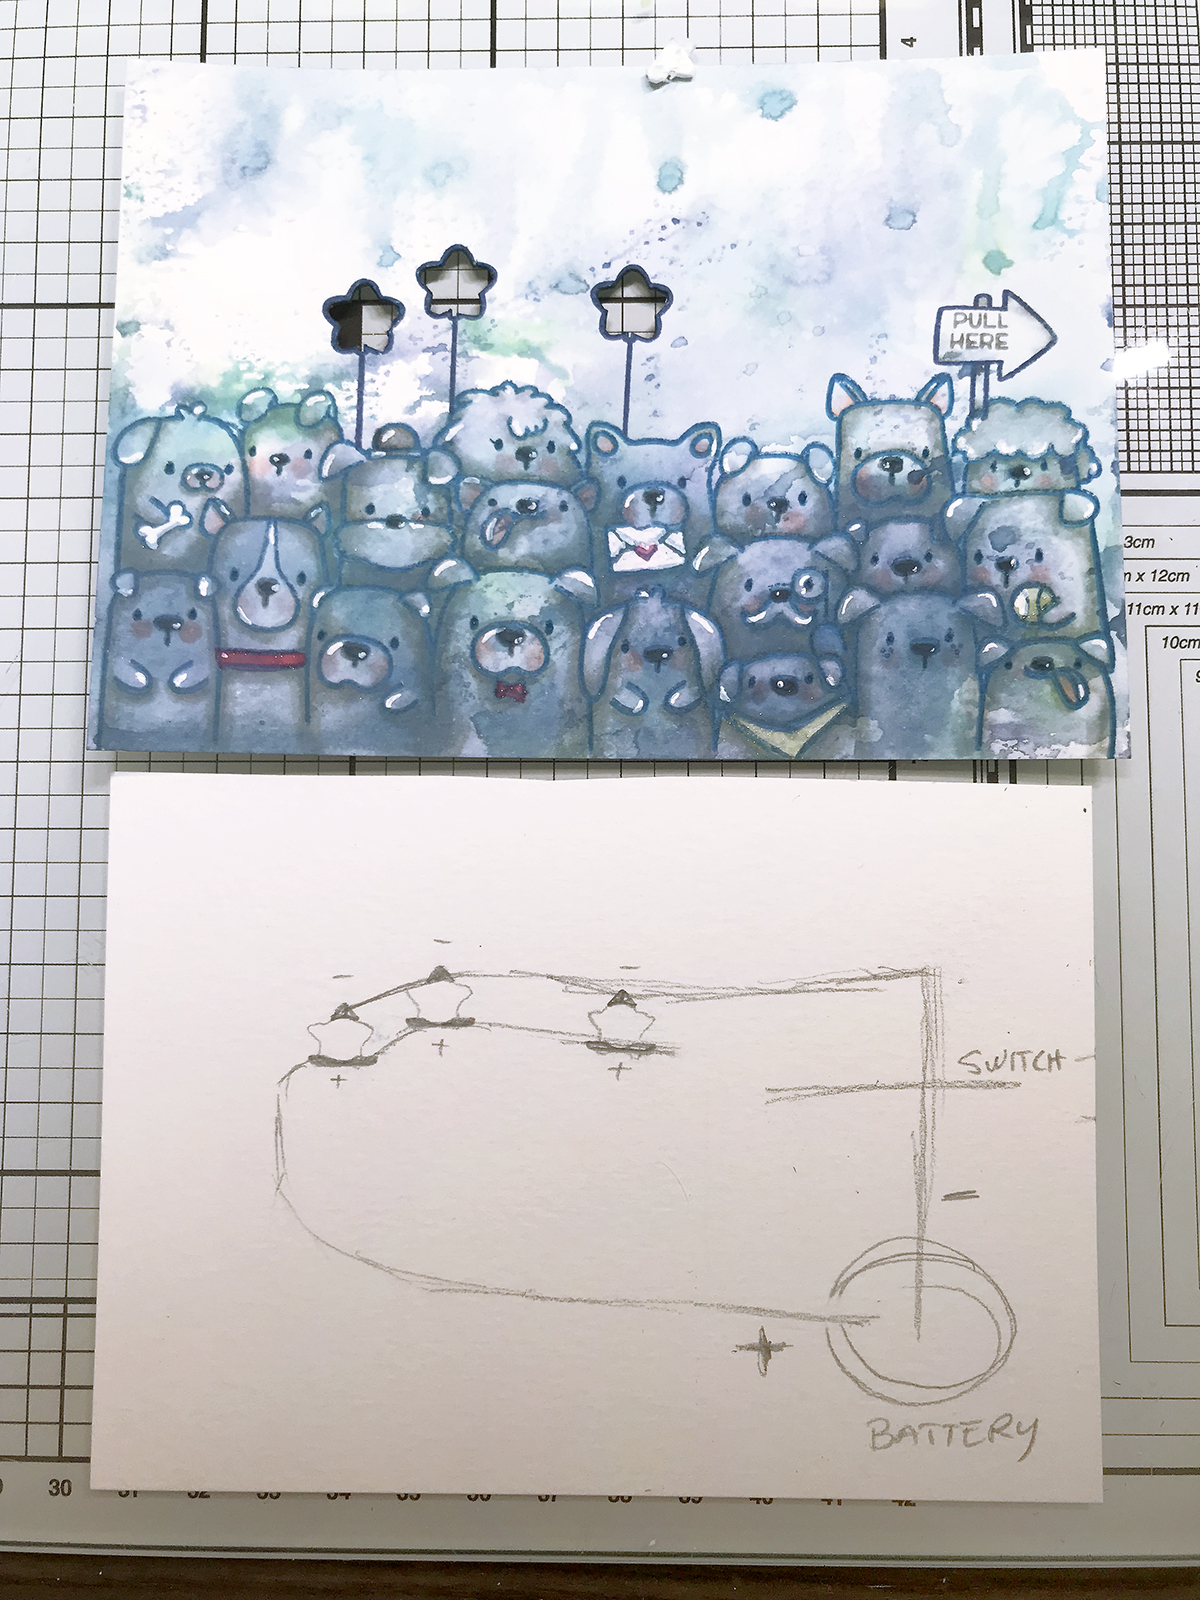
To make the card I stamped and colored the front panel and cut out the balloons that are going to light up. To color it I used a couple of Distress Oxide inks and smooshed the background in them, focusing mainly on the bottom of the card where the dog would be stamped. I used my Misti to stamp the dogs in blue. I then colored the dogs using Spectrum Noir Illustrator markers in cool greys with pink for the cheeks. Then I added some Sparkle to some of the areas, glaze for the noses and eyes, and some white accents.

I also marked where the switch would be placed and sketched in the circuit.

Maya_Isaksson_light_up_blue_bloghop_circuit2

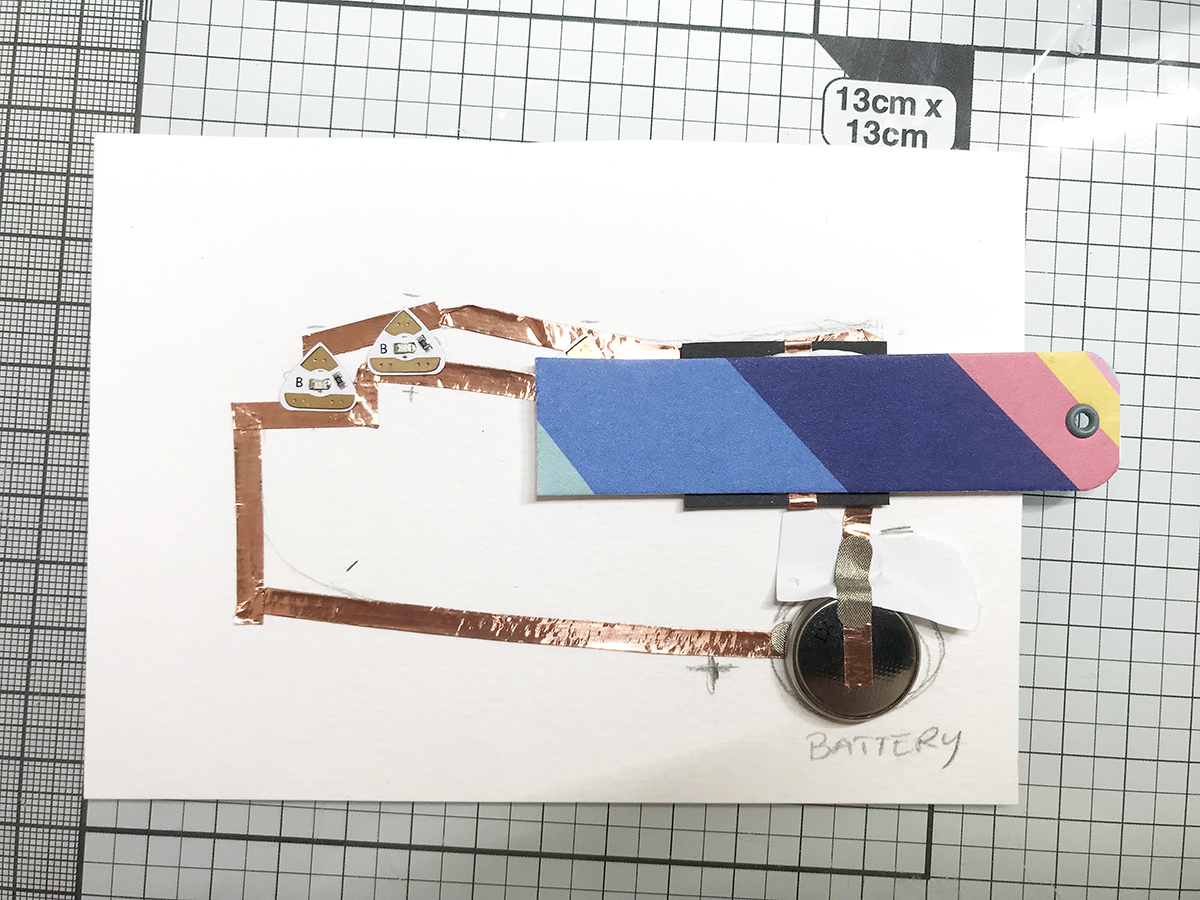
As usual, I did everything backward and had to flip the battery. I added a fabric patch to make sure the copper tape won't break if it moves around a bit. I later added a piece of printer paper under it to make sure the tape wouldn't touch both sides of the battery. If I had put the battery the right side it would not have been necessary.

Maya_Isaksson_light_up_blue_bloghop_circuit3

As usual, I forgot to take a picture when doing the switch. Basically, I just cut the paper using a craft knife. Added the switch I used fabric patches again on the inside of the switch and the edge of the paper where the switch is attached. I did this to make sure the copper tape doesn't break from sliding back and forth. Better safe than sorry. You can see the strip of printer paper here too.

Maya_Isaksson_light_up_blue_bloghop4

Here's the back of the switch, you can see the sliding mechanism.

Maya_Isaksson_light_up_blue_bloghop2

I glued the finished card to a card base and added some Nuvo Drops to make it a bit more fun. I love these adorable pups by Mama Elephant.

Maya_Isaksson_light_up_blue_bloghop3

And here's the card all lit up. I hope you hop on to see the other cards on the hop. You can find links to the rest of the team creations on the Chibitronics Blog post. I hope you enjoyed this card and the short tutorial.

Supplies used for this card:

Chibitronics:
Spectrum Noir Illustrator Markers: IG 1, IG2, IG3, IG6, IG7, IG10 FS4

Spectrum Sparkle: Macaroon, Moonlight, Clear Overlay

Stamps: Mama Elephant - The Dog's Woof

15 March, 2018

Glow up fireflies

[gallery ids="4800,4799,4797,4796" type="square"]

Today I'm up on the Chibitronics blog, showing how to make this fun card. I used LEDs and Glow in the Dark embossing powder by WOW! and they make such a fun card. I absolutly had to get the Lawn Fawn fireflies as soon as I saw them, I knew they would make a super fun light up card.

To see the full instructions check Out this blog post at the Chibitronics blog.

18 February, 2018

Light up windows with colored LEDs

I had so much fun doing the Chibitronics - MFT stamps blog hop this Friday. If you haven't hopped along yet you can find the post here. There's still time to hop today. If you leave comments along the way you can win prizes, and there are some pretty awesome projects along the way.

Maya Isaksson Chibitronics february 1

Anyway, today I blogged this card on the Chibitronics blog. If you hop on over there you will get the full photo tutorial and a nifty trick how to hide copper tape in narrow spaces.

Maya Isaksson Chibitronics february 2

The houses are a cut file by Pretty Crafty Stuff, you can find the link in the sidebar. I'm thinking about making some new designs for the shop. I haven't made any in a long time and I have some ideas. I'm also happy to get suggestions on new files. I can't promise anything but if I get inspired I might just cook up a new batch.

I'll get back to nursing my cold and feeling sorry for myself now. Maybe I'll watch some Olympics, so far Sweden is doing pretty great :) Are you watching? What are your favorite sports in the winter Olympics? I enjoy watching figure skating and alpine sports but my husband is mainly watching curling. It's a bit slow for my taste.


16 February, 2018

Chibitronics and MFT Stamps bloghop

27654405_10100244773090374_465318166796662149_n

Hi everyone! Time for another collaboration blog hop and this time with one of my absolute fav companies MFT Stamps. They have so many fun stamps and dies! If you leave a comment on this post you could win a shopping spree at MFT Stamps or a starter set from Chibitronics. The more posts you comment on the more chance you have to win.

Maya Isaksson chibitronics mft stamps bloghop 1

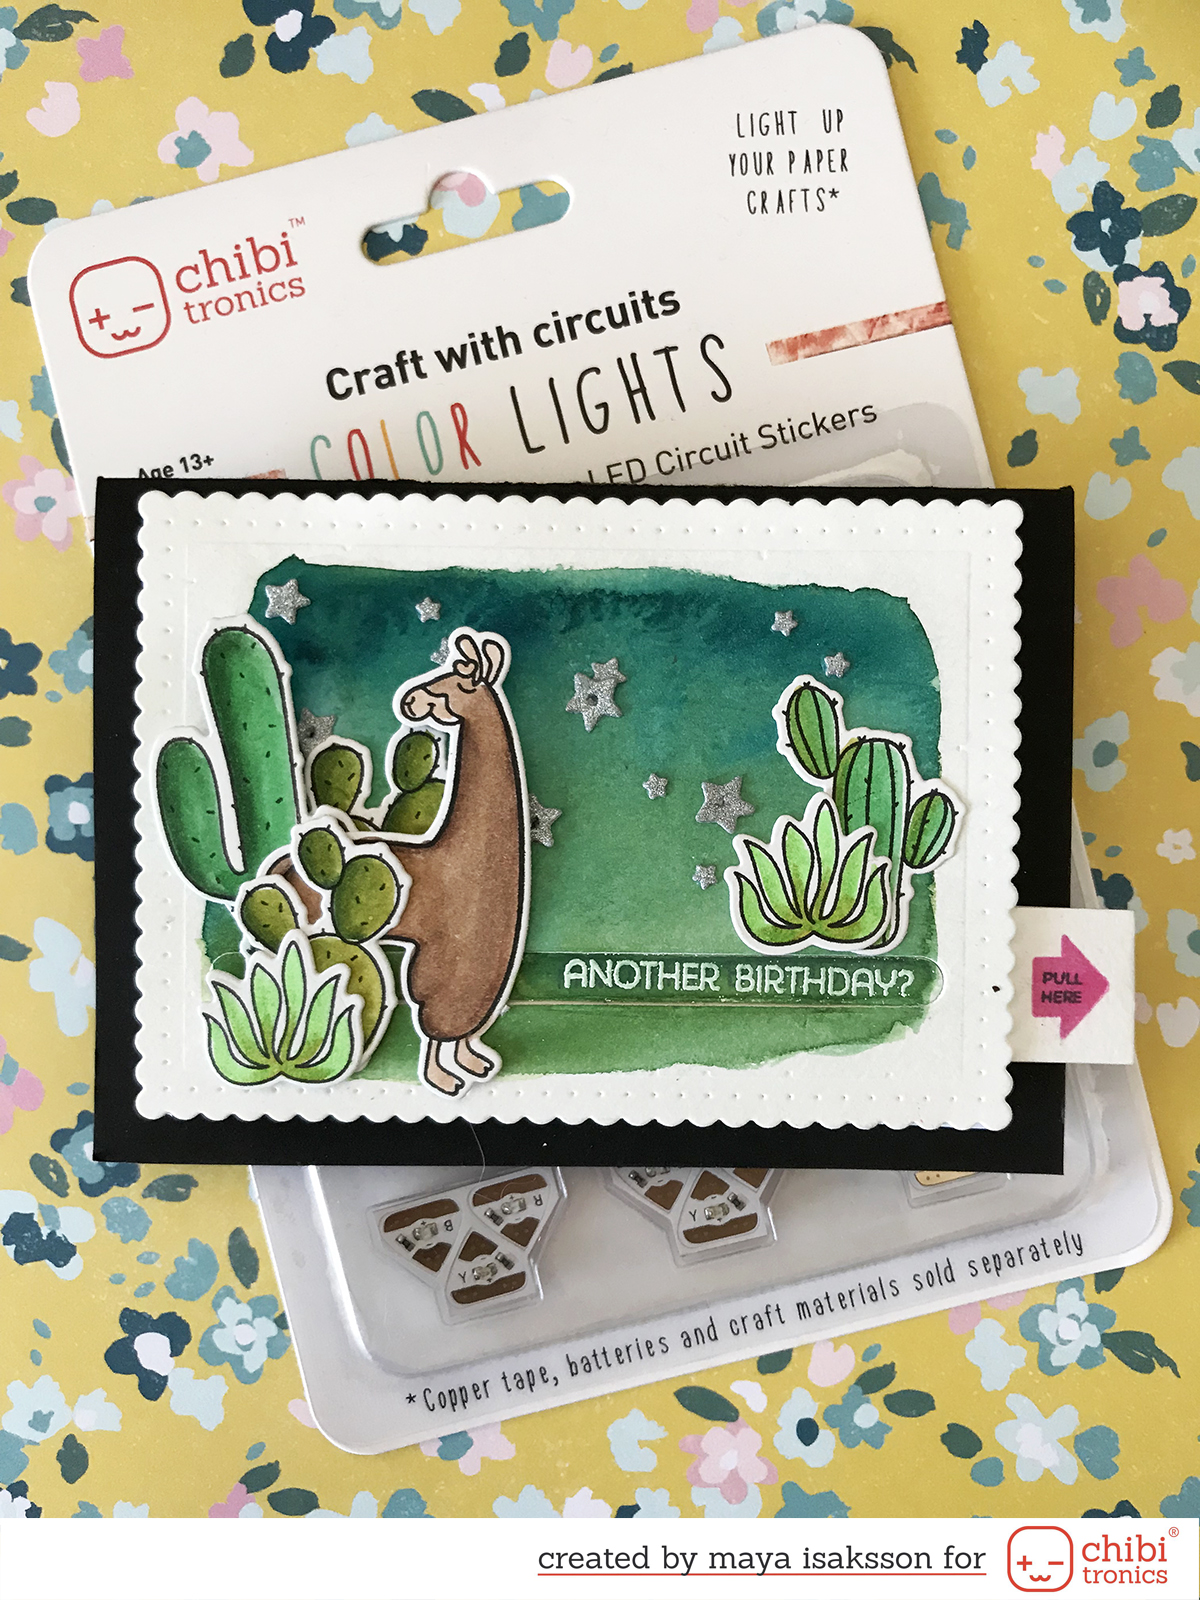
I used this lovely llama set called Llama Love and the coordinating dies for my focal image. I adore llamas and there are a lot of fun plants and texts to go with them.

Maya Isaksson chibitronics mft stamps bloghop 3

When you pull the tab the stars light up and the hidden text is revealed. Fun, right?

Maya Isaksson chibitronics mft stamps bloghop how to 1

Here are the parts needed to make this kind of card. You need a card front and cut out a slit for the text to show up under. Save the cutout piece as you will need it later. Die-namics Surf & Turf has a perfect slit to use for this.

You will also need a cover to hide the circuit under the slit. I stamped my message on this and it will be revealed when sliding out the switch to light up the stars.

The circuit is built on a separate piece of cardstock and I'm using a sliding switch for this card. It's basically an x-shape that goes through a slit in the paper and connects the copper tape both in the back and front when the switch is slid to the right position.

I also made another long piece to attach to the switch. The cover plate goes between this and the switch and this is what slides away to reveal the hidden message under it.

Maya Isaksson chibitronics mft stamps bloghop how to 2

Here's a close up of the circuit. It's just a regular circuit with three lights and a switch, it's just a bigger slider to show off the message and move the llama to the other side of the card.

Maya Isaksson chibitronics mft stamps bloghop how to 3

I added some foam tape to the switch to make sure the connection is good, as well as around the card. I didn't get a photo of the next step but I just attach the blank cover to the foam tape and the right outer side of the slider to the slider and backing. Then I attached the card front on top using glue, just making sure not to put any glue where the slider is moving.

Maya Isaksson chibitronics mft stamps bloghop 2

No probllama, right? I hope you enjoyed this card tutorial and that you have fun on the hop. You can find the list below and don't forget to leave a comment for a chance to win!


27658128_10100244773075404_4540928655884742529_n

Chibitronics Blog
Vanessa Amann
Tiffany Au
Maya Isaksson <- This is me :)
Eiko Uchida
MFT Blog

Supplies that can be handy for making a card like this:

28 December, 2017

Light up shaker card

Maya isaksson chibitronics new years 2018 1

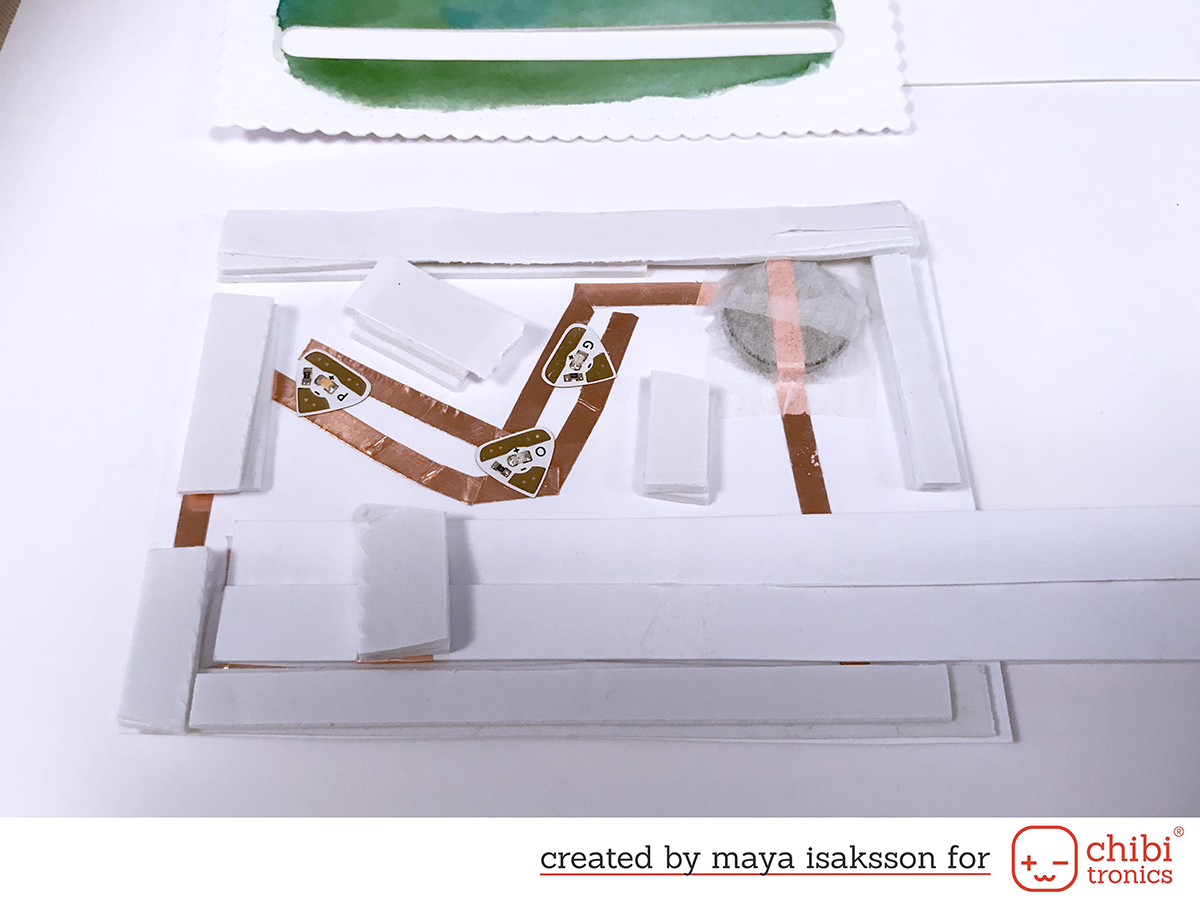
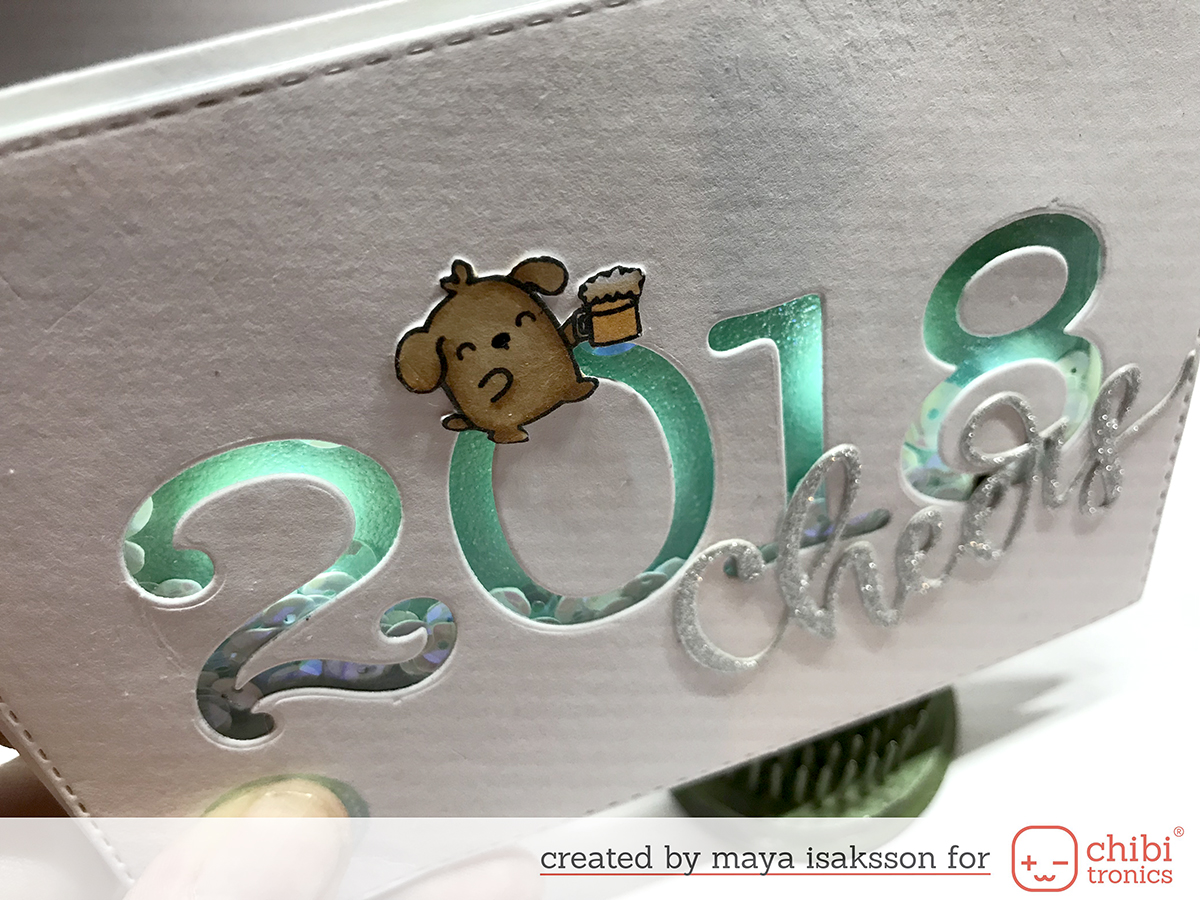
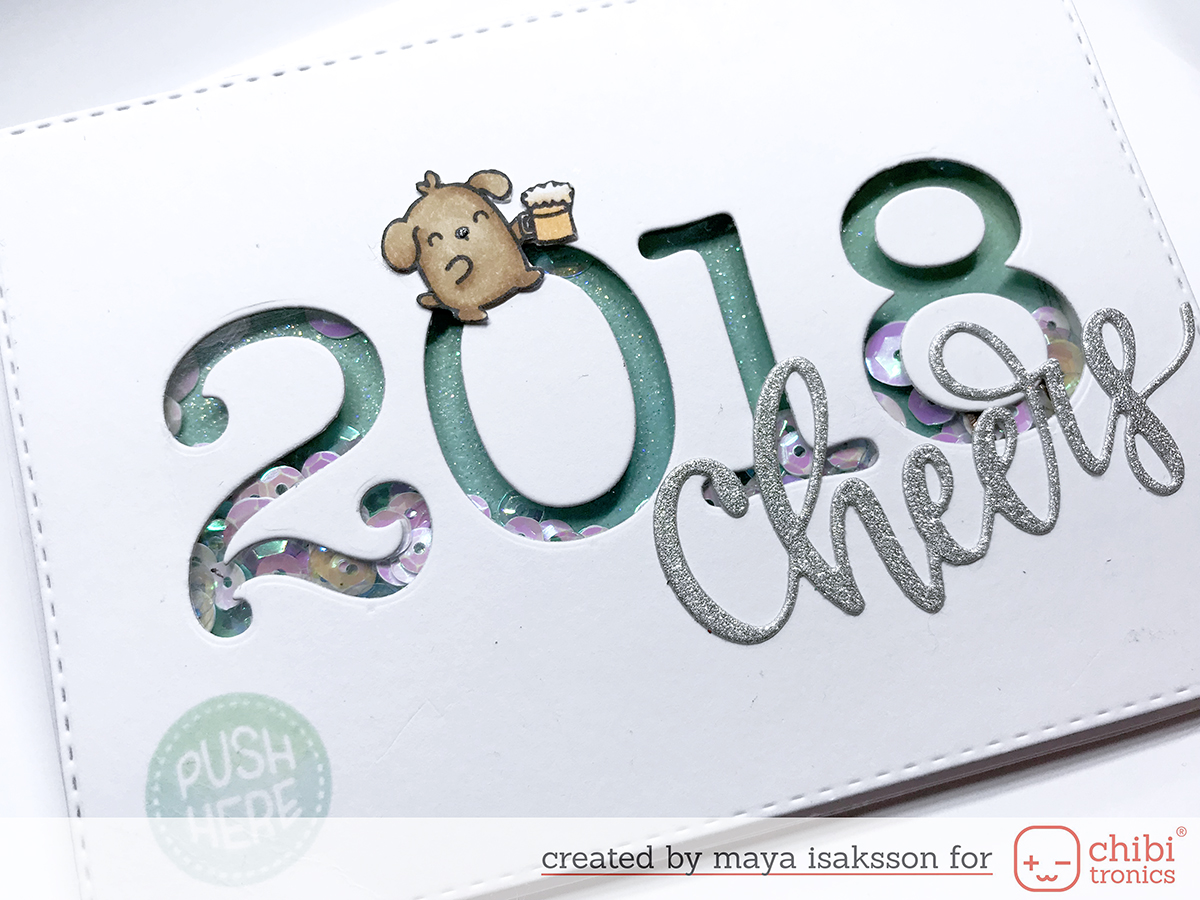
I can't believe that 2017 is almost over, it just swished by so fast. I really look forward to seeing what 2018 is going to be like, I think there will be a lot of crafting going on at least. We'll see. As I got to blog on one of the last days of this year I decided to make a new years themed card. It turned into a shaker card that lights up. I glitter embossed the backing panel so the lights would reflect the sparkles. I think it turned out pretty fun.

Maya isaksson chibitronics new years 2018

You can find the full instructions on how to make it over at my post at the Chibitronics blog. 

Maya isaksson chibitronics new years 2018 6

I hope your 2018 will be the best year ever. I wish you all the best and see you next year!

Supplies used:
Chibitronics Starter Kit w/ Circuit Sticker Sketchbook

OR

White LED Stickers Pack
Copper Tape


16 November, 2017

Sugar skulls with flashing eyes

Maya Isaksson chibitronics sugar skulls

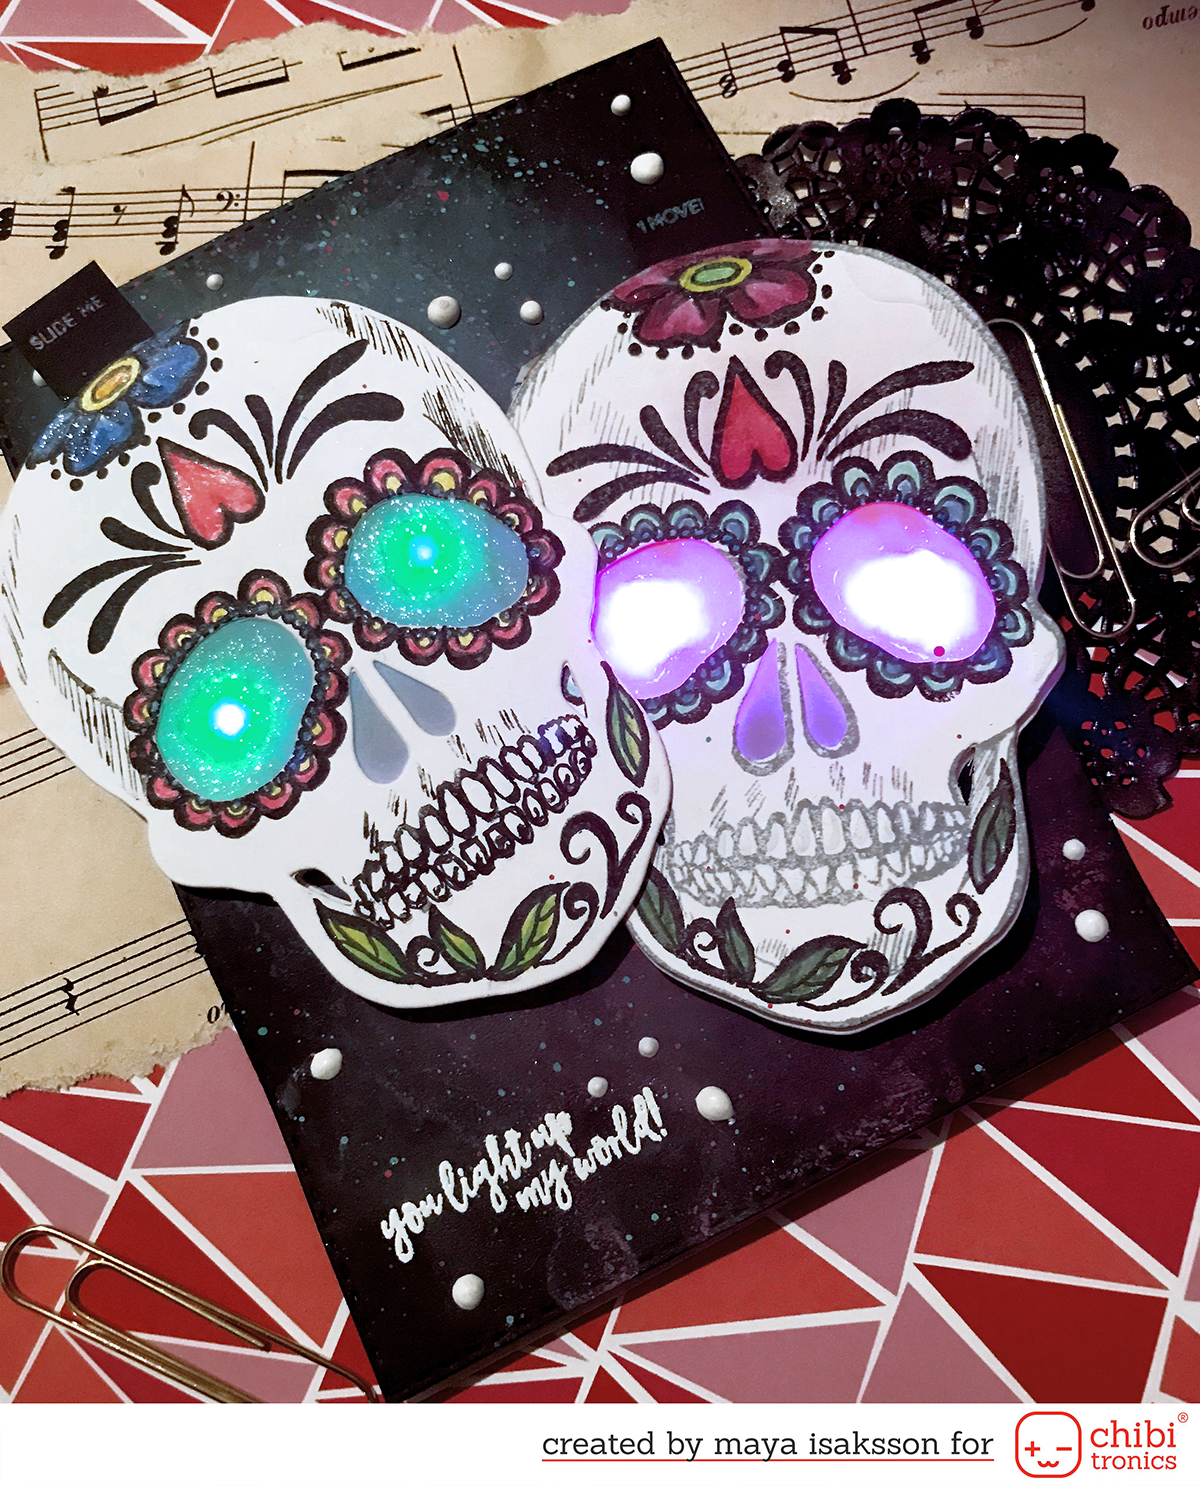
I love experimenting and trying to come up with new ways of doing things. These sugar skulls was an idea that I got and needed to try to make. The idea is that the skulls are attached on sliders and the sliders are also the switch. So you can move the heads up and down making them light up or turn off the light that way. I also added an effect sticker with heartbeat effect because let's face it, effect stickers are super fun!

Hop on over to the post at the Chibitronics blog to see a full photo tutorial of how i made this card.

[youtube https://www.youtube.com/watch?v=Y5ZOGYKjysk]


If you want to make a card like mine then you will need the following supplies from Chibitronics. The stamps are by Crafters Companion and sentiments from Heffy Doodle stamps.

Supplies: Circuit Stickers Effects Add-OnPink, Orange, Green MegaPack (30 stickers)Copper Tape,Chibi Stencil

10 November, 2017

Chibitronics and Sweet Stamp Shop collaboration

Maya isaksson chibitronics sweet stamp shop

First of all I want to welcome you to my "new" blog. It's really just the same blog on a new adress, looks a tad bit different but hopefully you will feel like home here. Just update your bookmarks or feeds and sit back and enjoy!

Today I have made a sweet card for a collaboration between Sweet Stamp Shop and Chibitronics. It's the last day of a full week of inspiration in the blogs so make sure to hop on over to look at all of the inspiration and of course there are prizes too! Yay!

[gallery ids="4722,4721" type="rectangular"]

I used this cute pup and made his had light up when pulling the tab, it's nothing complicated but I wanted to keep it pretty clean and simple. I masked the sentiment to match my motif. I had a lot of fun making it. Check out the full post on the Chibitronic blog for all the details.

31 October, 2017

Haunted Halloween house

Happy Halloween everyone! Here in Sweden we don't really celebrate Halloween but I still love the celebrations and all the fun spooky stuff that surrounds it. Today Chibitronics and Sizzix are having a collaboration and a I really really wanted to make a haunted house using the Tim Holtz dies. I mean, look at the house! It's so cool and and with Chibitronics I could make it light up too. So I started building and soon discovered that I just wanted to keep adding details to it. Here's a warning. This is a picture heavy post with pictures of both constructing the inside electronics and a lot of pictures of the outside. Don't tell me I didn't warn you!
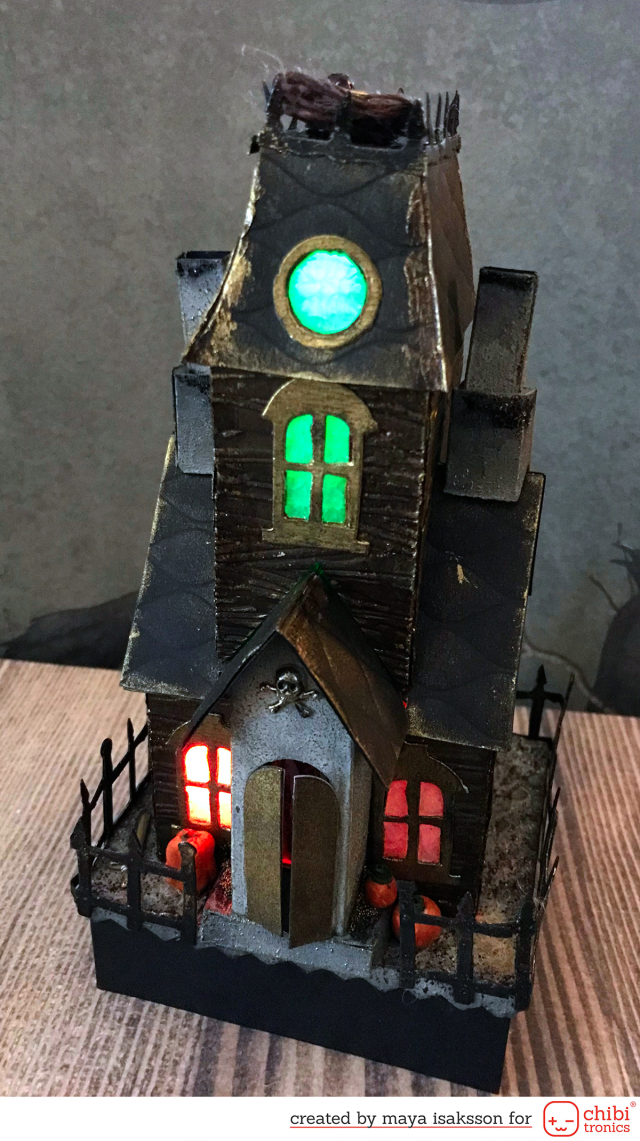
Maya Isaksson Haunted house chibitronics sizzix7

As you can see all the window lights up and I used different colored LEDs for different windows and also different effects for different windows. You can check out the video to see it in action.


[youtube https://www.youtube.com/watch?v=bXiYOY_Lmuc?feature=oembed]


It's really super cool, and the secret is the ChibiChip that makes it easy to program each LEDs behaviour. It's not hard at all, but if you aren't into programming (which you should be because it's super fun!) then you can use the effect stickers to achieve a similar effect.


Maya Isaksson Haunted house chibitronics sizzix9


I made a birds nest for a thieving magpie to hide it's treasures, some little trinkets I had laying around. The nest is made from twine dipped in matte medium and wrapped around my finger and left there to harden.


Maya Isaksson Haunted house chibitronics sizzix9


I found a small tombstone in my charm box and colored it grey and added some dry grass. Packing twine cut up inte short section creates a yellow-brownish dried grass that you can glue down. And can you spot the sword in the background by the front? I made the cracked window panes using vellum and covered it with crackle accents.


Maya Isaksson Haunted house chibitronics sizzix4


I went through the kids pearls and made pumpkins out of them. The larger one was already pumpkin shaped so I just painted it and cut off the top ring. The smaller ones I painted and then rolled up green paper and put inside to act as stems. The ground itself is embossed first, using an embossing folder with round polkadots. Then I painted it and added structure by dotting my finger on the paint before it dried. I also added some different types of Distress Stickles in earthy colors and some gold micro beads that I toned down with some diluted black paint. And I cut some more of my string to create patches of dried grass.


Maya Isaksson Haunted house chibitronics sizzix2


To build the house itself I started out by cutting everything out in just plain white thick cardstock. I built the house following the instructions. Then I made wooden boards by embossing a piece of brown cardstock, cutting it into strips and then using distress ink to darken the edges a bit before gluing them to the house. I also embossed black cardstock for the roof. I used an WRMK next level embossing folder for that, it looked a bit like tin roof. For the front porch piece and the chimneys I colored it using gesso that I dyed grey and applied with a finger, just tapping the cardstock to create an uneven surface. I added gilding vax to everything to bring out the details and then I also added some different brown and black Distress stickles so it catches the light in some angles. The door and the window trimming is coated with a thicker layer of gilding vax. I also added a black raised platform to be able to fit the ChibiChip under it.


Maya Isaksson Haunted house chibitronics inside1


For the inside I created a slightly smaller house and marked the placement of the windows of the outer house.


[youtube https://www.youtube.com/watch?v=RriYq-EALgY?feature=oembed]


I also cut a hole in the roof of the outer house to be able to light up the top windows too. That's what the long flappy thing goes. Here's a video so you can see what the inside part looks like all the way round. When copper tape overlaps I build bridges using washi tape so they won't touch.

Maya Isaksson Haunted house chibitronics inside1


I wanted to make sure you was able to change the batteries when they ran out so I made the battery holder inside the inner house and made hinge for it to be able to flip up to change it. I have cut a hole in the bottom plate to allow the copper tape to reach the chip on the under side of the platform. The hinge also works to allow the copper tape to go over it down on the underside. I also marked what LED was which, using numbers, so I knew when later programming them.


Maya Isaksson Haunted house chibitronics inside1


Here's the underside with the ChibiChip. Each number corresponds to one (or in some cases two) LEDs. And the GND is the negative for all of them. I made one long strip connecting the negatives leading to the left ground connection. The GND on the right side and the +3V connects to the battery. So the battery powers the chip that tells what lights to light up. You program it by connecting it to the audio port on your computer or any device really. It's really easy, there are great instructions on how to connect and code the chip here on the Chibitronics website.
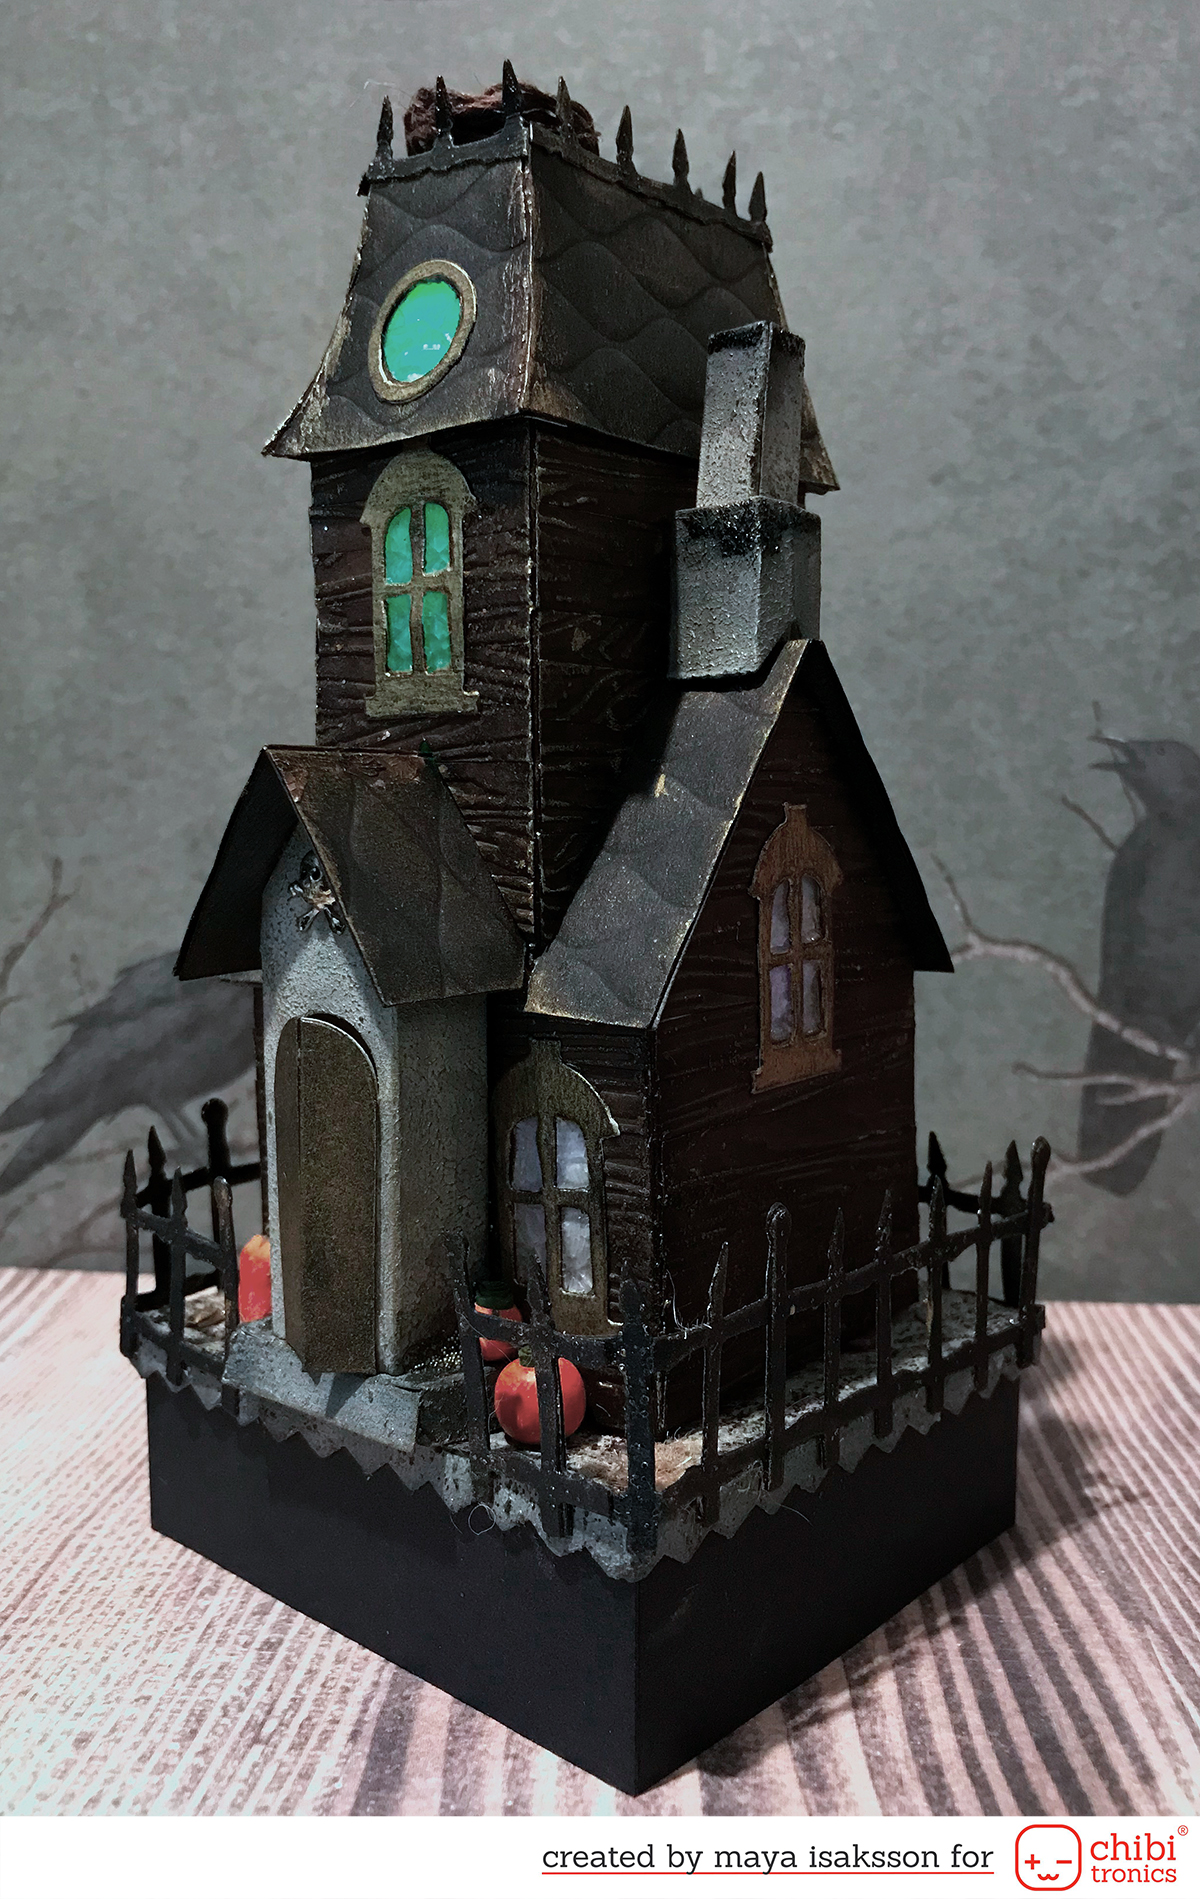

Maya Isaksson Haunted house chibitronics sizzix2


Ti make the house not move around on the base I cut two slits in the base plate and attached strips of cardstock that I glued to the house. I can push down the cardstock flaps into the slits and fold them to keep the house secured to the ground. when I want to change the batteries it's easy to just lift the house up and flip the inner house to the side and change the battery, and then just put back the house once again.
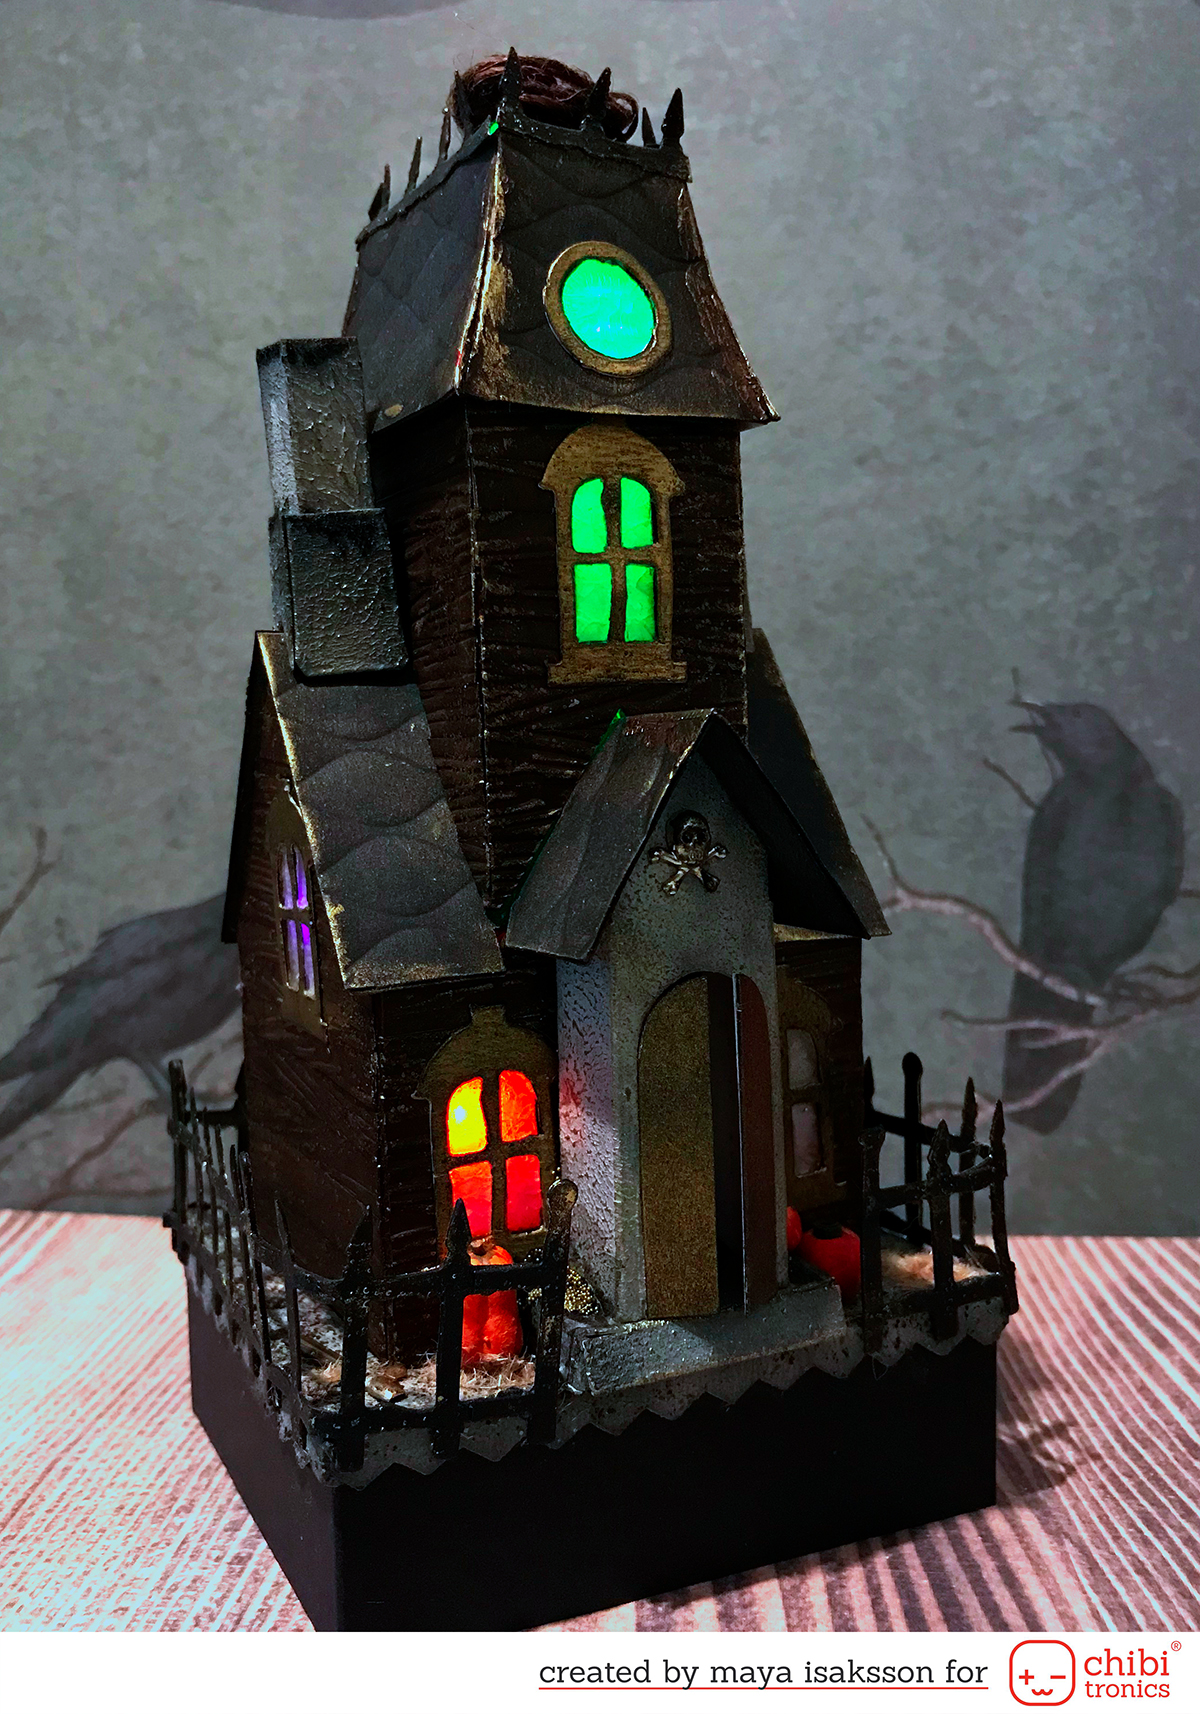

Maya Isaksson Haunted house chibitronics sizzix2


I hope you enjoyed my project. It is by far the funnest one I have made in a long time. These houses are so much fun. My 9 year daughter was building a house before I even got to use the dies, she was super happy to get to make it her own way and had no problems figuring out how to do it. Hers does not light up but it's super cute.


Please stop by the Chibitronics blog for links to my DT friends who also built some amazing houses.


Here are the materials I used:


Love To Code Chibi Chip
Pink, Orange, Green MegaPack (30 stickers)
Copper Tape
White LEDs MegaPack (30 stickers)
Sizzix Bigz L Die - Village Manor Item #661591
Sizzix Bigz XL Die - Village Dwelling Item #660992

15 October, 2017

You light up my world - Chibitronics and Heffy Doodle

Maya Isaksson Chibitronics september 2017


Today I made a tutorial for the chibitronics blog on how to make this card twinkle with lights. I used the Chibitronics effect stickers, they are super fun! If you want to see how I made it, hop on over to this blog post and you can see the inside of the card and learn how to make one by yourself.


[youtube https://www.youtube.com/watch?v=jJtf-ytxSi8?feature=oembed]


I absolutely love this happy crocodile, he is so adorable. He's from Heffy Doodle stamps, who also made the tiny press here stamp from a set that is perfect for interactive cards. I also used some of the opaque embossing powders by WOW to make the background, they look almost fluorescent against the black background. The dotted stamp is by Dylusions/Ranger ink. 


I hope you are having a wonderful weekend. I think I will spend the day in the sofa, listening to a good audiobook and knitting. I think that would be an excellent way to spend the afternoon. Or should I go craft something? I really can't decide. Weekends with no plans are my favourite thing!

07 October, 2017

Chibitronics and Honey Bee Stamps bloghop

22256402_10100198452137934_5468357390611160139_o
World cardmaking day is one of my favourite days of the year. I love hopping along in all the fun bloghops and always try to take part in at least one challenge somewhere. There's a lot of fun going on around the web today. So I'm particularly excited to be a part of this hop along with Honey Bee stamps and Chibitronics. I hope you will find a lot of inspiration along the way and you have a chance to win some fun prices too.


Honeybee is giving a $25 gift certificate drawn randomly from comments left across all blogs and Chibitronics is giving away a starter kit so you too can have fun and make light up cards and other crafts . Comments will close at 11:59 ET on Sunday, October 8th and the winners will be announced next week.


22256402_10100198452137934_5468357390611160139_o


I absolutely adore this stamp set called Country Blooms so that's what I used for my card. To be honest they gave me a bit of a struggle since I was experimenting with reactive mist and foil for this card and my idea of painting the flowers with mist and then foil them wasn't the success I was hoping for. I think more mist will solve this problem but I hate to toss anything I've started so I kept at it. I kinda liked the mottled effect of the foil.


I watercolored the flowers red. Well, as you can see they are not red, it looked super weird. So I sort of lifted the color and added blue instead. This was better but originally I had embossed the lines in a beautiful speckled embossing powder that did not make the flowers look flowery at all. So I embossed them again in silver (thank you MISTI for once again saving me from a bad decision) and it started looking better. When the background was in place I was actually really happy with the weird mottled flowers.


Here's what went wrong next. I was going to diecut text that would light up, using letter dies. Well when I started looking around ALL of my dies was missing. Turns out I had left them at a craft event I went to the week before. Doh! So, what to do then? I went through my stash with really old things that I haven't used for years and found this butterfly die that went perfectly with the flowers. It was so much better than the letters I had thought about so it all turned out well in the end but hey, this card was a struggle from start to finish! Still, I'm super happy that I did not toss it and started over.

Maya Isaksson Chibitronics Honeybee hop2


Look at the foiled gold speckles and the foil in the flowers. So pretty. And the lights from under the butterflies wings are really catching the foiled to reflect off the card. I don't even mind having mixed gold, rose gold and silver on the same card. My OCD was screaming STOP but I pushed on.


Maya Isaksson Chibitronics Honeybee hop2


Making the card I went through the same steps as I always do when adding LEDs. I have seen some of my friends on the Chibitronic teams very neat plans for their cards. Let's just say that I'm not a neat crafter. I'm more of a do-stuff-first-think-later kind of crafter. LEDs take a bit of planning but most mistakes is fixable when you suddenly remember you forgot to add a switch or place for the battery ;) Aaaanyways, I start by marking where the lights should be placed. In this case under the butterfly. I lifted the wings and drew small marks to see where to put them.


Maya Isaksson Chibitronics Honeybee hop2


I then drew out the circuit. As you can see, not tidy at all. No one will see the inside (except for you, but you won't tell. Right?) I have found adding a pull switch is better for my LED cards You can sort of turn on the lights and let them shine and not have to push down on a button type switch. But it depends on the kind of effect you want too.


Maya Isaksson Chibitronics Honeybee hop2


Talking about switches. I wanted to show how I make mine. Here's the card with the tape and LEDs in place. The switch is on the right side.


Maya Isaksson Chibitronics Honeybee hop2


 I made a T-shaped paper strip and added foam tape to the sides and as a stop to the left so you can't push the tab all the way in. I also put tape on the T-shape BUT DON'T TAKE OFF THE PROTECTION PAPER ON TOP! (you may ask why I have to actually write that out. It's because I've done it myself. More than once. Doh!) This foam tape is for pressing down the switch and making sure the connection is good. Removing the protection paper would make the switch stick to the top and not slide. 

Maya Isaksson Chibitronics Honeybee hop2


Here's what the switch look under the sliding part. I cut off a tiny bit of the tape to break the circuit. I add copper tape to the bottom of the slide, so when it covers the gap the circuit is closed again. 


Maya Isaksson Chibitronics Honeybee hop2


And here's my finished card. No sentiment feels a bit weird but I guess you could stamp something on the inside to fit the occasion. I hope you got inspired and keep jumping along on the list below. Have fun and have a fantastic World Cardmaking Day. 


Chibitronics supplies used:

White LED stickers pack


Copper Tape


CR2032 battery


Honey Bee Stamps http://blog.honeybeestamps.com/world-cardmaking-day-collab…/


Amy Rysavy http://prairiepaperandink.typepad.com/…/honey-bee-stamps-ch…


Eiko Uchida https://eikenlabo.blogspot.com/…/chibitronics-and-honey-bee…


Emily Midgett https://emilymidgett.com/…/world-cardmaking-day-honey-bee-…/


Kelley Kohout https://inkohoutsdesign.blogspot.com/…/world-card-making-da…


Kelly Griglione https://notablenest.blogspot.com/…/chibitronics-and-honeybe…


Kelly Szafron https://kellyspapercrafting.blogspot.com/…/hi-welcome-to-my…


Lisa Cisneros https://happypapercrafts.blogspot.com/…/world-cardmaking-da…


Maya Isaksson http://mayasblog.typepad.com/…/chibitronics-and-honey-bee-s…


Melissa Bickford https://melissabickford.blogspot.com/…/honey-bee-stamps-chi…


Nichol Spohr http://nicholmagouirk.typepad.com/…/world-cardmaking-day-bl…


Taniesa Vlasak https://thecraftypickle.com/…/a-bright-idea-using-honey-be…/


Tiffany Au https://cardsbytiffanyblog.wordpress.com/…/chibitronics-hon…


Tracy Freeman http://inkyfingersandribbon.com/…/world-cardmaking-day-hon…/


Vanessa Amann http://vanilljas.blogspot.com/


Vera Wirianta Yates https://lingshappyplace.blogspot.com/…/honey-bee-stamps-chi…


Wei Wei Wang https://twwangkamiy.blogspot.com/…/chibitronicsandhoneybees…


Chibitronics Blog https://chibitronics.com/blog/hbhop


Related articles

Giveaway at WOW and a PCS card

First Guest post for Faber-Castell Design Memory Craft

Sending Smiles

Prairie Paper & Ink: Honey Bee Stamps Hey, Pumpkin! | Mission Gold Watercolor | AmyR Halloween 2017 Video #9

Sizzix Documents Adventure with New Eileen Hull Crafts Collection

Hopping With Honey Bee! - the CLASSroom

Santa mermaid

Today the Chibitronics team has the great pleasure to collaborate with Waffle Flower . They make the most unique stamps, and I fell in love ...